The recent 1.0 release of test-kitchen (and the existence of kitchen-docker) gave me the push I needed to start using Jenkins to test my Chef cookbooks. Although I've heard plenty of people talk about doing this, I struggled to find much in the way of guidance or detailed descriptions.
Finding nothing to crib from, I decided to first build a spike to better understand what was involved. The result is Cooking With Jenkins, a cookbook and Vagrantfile that installs Docker and Jenkins, configured to run tests on a few cookbooks. If you're new to these tools, I hope it will be a useful example to help you get started. If you're already using them, your suggestions for improvement will be rewarded with thanks and beverages.
What's In The Box?
The base system is Ubuntu 13.04 (from a Bento box). Jenkins and
Docker are installed via the jenkins and docker cookbooks, and
ruby1.9.3 comes from a system package.
The cookbook installs and configures various Jenkins plugins
A recipe
installs and configures various Jenkins plugins, including git,
warnings (to parse Foodcritic output), ansicolor (to colourise
console output), and config-file-provider (to add static files to
the job workspace before testing).
A Chef definition wraps up the details of Jenkins job creation, and it assumes that the cookbook repo provides a Gemfile and Rakefile similar to those in mlafeldt's skeleton-cookbook. You can see the definition in use in this recipe.
Questions To Consider
You'll find a lot of questions when building a Jenkins system for cookbook testing, and most have more than one right answer - you'll need to consider the trade-offs, and choose what's best for you.
The Jenkins server I'm building will only be used for testing a private set of Chef cookbooks deployed in a homogeneous environment. This is as simple as it gets, so I've avoided some complexity that might be essential in other environments.
How should I install Ruby?
If you need to test your cookbook with multiple rubies, you'll probably want to use something like rbenv or rvm. I only need to worry about 1.9, which I installed with a system package.
Where should I install gems?
The tools we'll use to test our cookbooks are packaged as gems, and they need to be installed somewhere before we can use them. The generally recommended option is to include a Gemfile in each of our cookbooks, and use Bundler to install a local copy of the gems for each Jenkins job. Another option is to install all the tools once, in your system gem location.
If you use system gems, you'll save some time and disk space (they only need to be installed once), and you won't have to manage a Gemfile in each of your cookbook repositories. On the other hand, you can't use different gems (or versions) on a case-by-case basis.
Using Bundler means more boilerplate in your cookbook repositories, but it has the advantage of being explicit about your requirements. This makes life easier for other people developing your cookbooks, and it's absolutely essential if you'll also be testing them on something like Travis CI.
Where should I define the test commands?
When we define jobs in Jenkins to test our cookbooks, we'll need to specify the commands used to run the tests. An obvious approach is to use the command-line tools (eg, foodcritic) directly, but many people wrap the tasks up in a Rakefile and call everything through rake.
The main advantage of using the tools directly is that you don't need to maintain a (possibly identical) Rakefile in each of your cookbook repositories. On the other hand, you'll still want to run tests in your development environment, and a good Rakefile saves you from remembering the precise options you need for each command.
How should I map cookbook tests to Jenkins jobs?
A Jenkins "job" involves a workspace (a directory containing the revision of code you're testing), one or more build commands (for us, that's test commands), and zero or more actions to run following the build. Jenkins also supports chaining jobs, so that one job finishing schedules a second job. This allows you to build pipelines of activities, contingent on the success or failure of earlier jobs. Various plugins exist to extend the core functionality, such as the Build Pipeline Plugin and the Multijob Plugin.
That's a lot of complexity, which I opted to ignore by creating a single job (for each cookbook) that runs all of the required tests. I will certainly revisit this in the next iteration.
Installation Instructions
The Vagrantfile specifies a "Bento" basebox, which doesn't include a provisioner - so you'll need the "vagrant-omnibus" plugin installed if you want to try it out. It should work fine under Virtualbox, but I've been using VMware as it seems to cope better under load.
git clone https://github.com/zts/cooking-with-jenkins
cd cooking-with-jenkins
vagrant up
When Vagrant finishes provisioning the machine, Jenkins will be available on http://localhost:8080/.
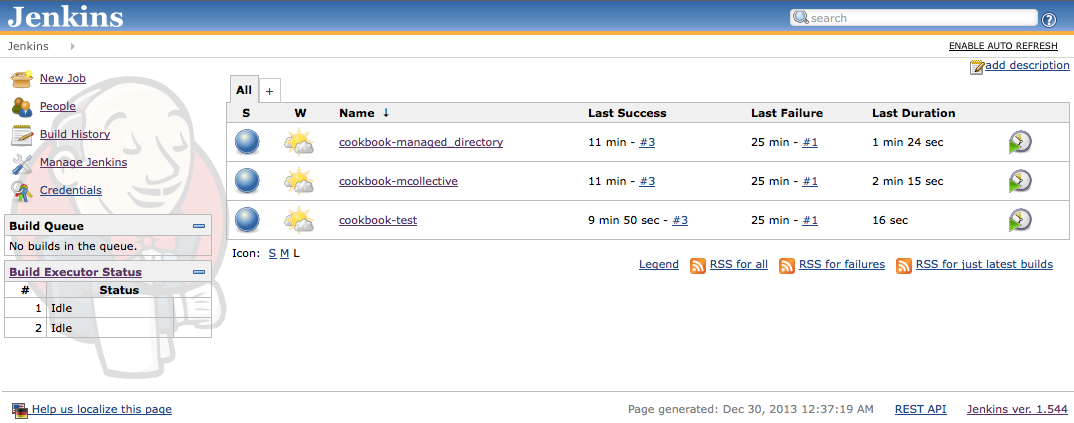
Known Issue: The machine creates test jobs for three cookbooks, and the first test run for each (during provisioning) fails, so when you first load Jenkins you'll see something like this. I suspect this would be fixed by restarting Jenkins after adding plugins (the "configure-jenkins" recipe) and before defining the jobs, but it didn't bother me enough to add the necessary hackery.
Click "Build Now" on each job and you'll see them work correctly.
What Does It Look Like?
Cookbook overview
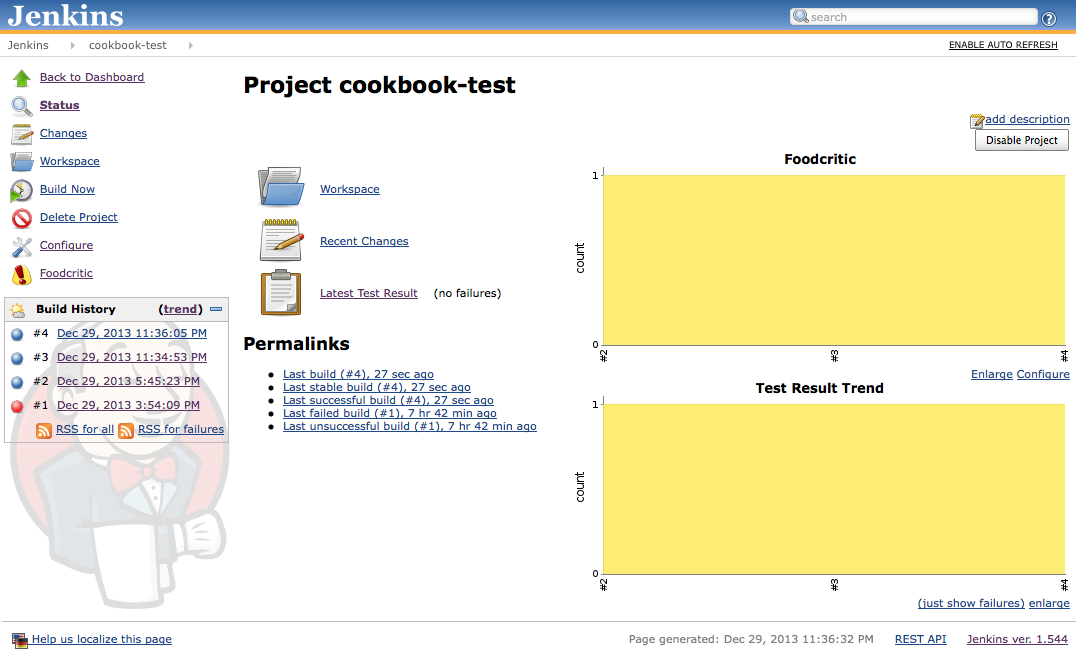 As this cookbook has a single foodcritic warning, and a single "pending"
chefspec test, the graphs are uninteresting yellow rectangles.
Clicking the Foodcritic link on the left takes you to...
As this cookbook has a single foodcritic warning, and a single "pending"
chefspec test, the graphs are uninteresting yellow rectangles.
Clicking the Foodcritic link on the left takes you to...
Foodcritic report
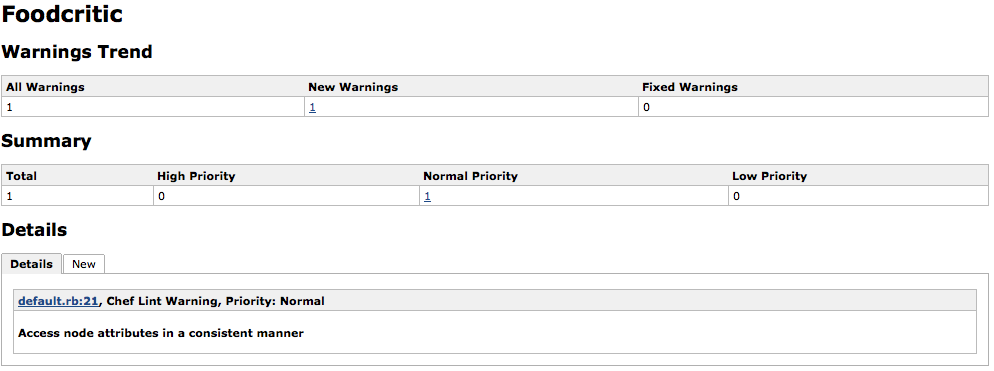 Again, this would look more interesting if a bunch of problems were
being reported, instead of just one example.
Again, this would look more interesting if a bunch of problems were
being reported, instead of just one example.
Colourised job console output
 This shows the bottom of the console output for a job that ran
test-kitchen. It's not the easiest on the eyes, but I think it's
better than raw ANSI colour codes in your browser. Also, note that
the time to test this (admittedly simple) kitchen instance was just
under 43 seconds. Test Kitchen with kitchen-docker is awesome.
This shows the bottom of the console output for a job that ran
test-kitchen. It's not the easiest on the eyes, but I think it's
better than raw ANSI colour codes in your browser. Also, note that
the time to test this (admittedly simple) kitchen instance was just
under 43 seconds. Test Kitchen with kitchen-docker is awesome.
What's Missing? What's Next?
- In this demo, you always need to click "Build Now" to run tests for a cookbook - Jenkins doesn't even poll github to see if the repo has changed. A better solution would be to use commit hooks to notify the Jenkins API that a new revision is available for testing.
- test-kitchen instances are currently tested sequentially, but using docker lowers the overhead enough that a few could be run in parallel.
- Nothing happens after the tests pass. I plan to add another step that uses Berkshelf to publish the cookbook to a Chef server. Tagging the git repository might also be a nice touch.
- Instead of running all the tests in a single job, a more sophisticated pipeline would first run ruby/erb syntax checks, then foodcritic and chefspec in parallel, then test-kitchen if both of those passed, before finally uploading the cookbook using Berkshelf.
- When test-kitchen fails, you'll need to look at the console output to see why - it can't currently export test results the way that chefspec can. Keep an eye on this pull request
- For my use case (running identical tests for internal cookbooks), I'm not convinced about maintaing a Gemfile+Rakefile in each cookbook. This feels like a violation of the DRY principle.
Other References
Although I didn't really find anything offering a detailed, end-to-end walk through setting up Jenkins for cookbook testing, I did find some clues in these posts:
- http://blog.bscott.me/2012/12/08/Chef-Testing-Part-2.html
- http://blog.safariflow.com/2013/06/26/continuous-integration-for-chef-with-vagrant-jenkins-and-gitlab/
- http://jtimberman.housepub.org/blog/2013/05/08/test-kitchen-and-jenkins